Initially I thought some of the pads suggestions in the course were silly but in time I’ve grown to see that a great deal of consideration has been put towards and implemented most of them accordingly. In fact I may realize that writing this post was idiotic in a few weeks time but…woteva.
One example was the crash: It seemed inconvenient, (as per quest for goove) to have it so far away but like the toms it’s not as though you’re hitting them frequently and it became self evident, once I started implementing the ride, that the ride needs to be closer to the action with the crash banished to the outer solar system, (pad 16.)
However one which I still can’t bring myself to change, and possibly to my peril, is the open hat. I have 2 slight variations of the closed hat that can be altered effectively for each hat hit to give the sound movement so it makes sense that they be next to each other as they are accessed so frequently. The open hat, while critical, therefor seems to be better placed on pad 9 of a 16 pad controller, (far left third row moving upwards) as it is used less frequently.
Similar to the hat scenario is also my kicks. My NON dominant kick is softer and with the velocity envelope shorter, (to give it a duller aesthetic as a drummer can’t thump both kicks with the same velocity) and therefore I often interchange between both variants but this does not seem to be explored in the free courses I have been thru thus far.
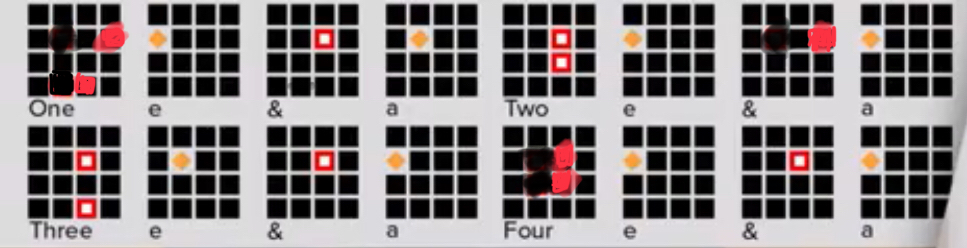
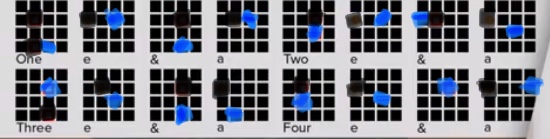
When simply playing RLRLRLRL The open hihat placement on pad 9 is convenient only when you need the open hihat in between the beats. When you want to open it up on the one, or together with a snare on the 3 or something (i kinda like to do that, Nate Smith style ) it’s nice to have it in the middle between the hats. That way you can pick where you place it and it doesn’t have to be upbeats only.
A good example of having the hihat placed where it is is for the beats in this video: https://youtu.be/iM11Xiwcg_s?t=91
For the kick drums, setting up two kicks and configuring one to be softer than the other is a useful thing to do. In general, messing around with velocity curves of sounds and or pads is something we finger drummers need because our range in loudness from soft to loud is incredibly small, so we need al the tricks in the book to get a beat to sound the way we want.
Adjusting the layout to a particular song you’re playing is also not a bad thing to do. I adjusted it for playing jazz to get 4 snare hits with brushes on pads 5 to 8 for example (got rid of the sidesticks).
When I play a tune that needs a lot of stuff with two hands on the ride and less on the hihat it’s sometimes convenient to just put another ride there on pad 9.
I keep finding time and time again that the layout serves me well 99% of the time and there’s no clear permanent ‘improvement’ to be made that makes me play better or makes it easier to get things done. Right now I’m working on a course about something that does improve your capabilities a lot on 16 pads, which is breaking free from jsut alternating RLRLRL and going for all kinds of combinations of single or double taps with both hands, sometimes switching which hand falls on the downbeat and offbeat.
That’s not something I recommend anybody who’s getting started to do by the way, but when you can comfortable churn out a RLRRLRLL pattern just like you churn out RLRLRL you’ll find that you can fly
Awesome!!! May I suggest you to do single hand exercises to acquire dexterity in all fingers? It is fairly easy to “transpose” existing exercises to “single handed/single hits” (if you know what I mean). Example adapted from the “Funky Drummer” beat (right hand):
I might be able to contribute to that (if you are ok with that). I’ll join the class in October so we can talk about that later.
Yeah the thing with changing the diagrams to make an exercise easier is a bit of a grey area as it depends on what you’re trying to achieve.
So if the goal is to rewire your brain to move ‘naturally’ in other ways then you’re used to then modifying the pad layout sort of defeats the purpose of the exercise.
If the goal is to just play the groove, everything is allowed. There’s no “wrong” way to lay out the sounds on your controller and the rule with making music is basically “if it works it works”.
So yeah, depending on what your goal is you can modify pads and sounds to whatever you want.
As for exercises for multiple fingers: I found that the way of playing that gives me the most control basically comes from the wrist. What finger is used to hit the pads doesn’t really matter, its mostly wrist movement.
Not to say there’s no benefit from training your fingers as well, but so far it hasn’t come up in my own practice or playing and that to me is always the leading direction in which I take the lessons. That way I can “vouch” for the exercises I give people because I actually used those exercises myself to achieve a certain goal in my playing that then in turn served my music.
So its sort of a long process before I know what to say about certain topics… a jazz course for example… it will come but it’ll probably take me another year.
And independent finger agility… I know nothing about that at the moment so telling you guys you should work on that feels a bit weird if I don’t do it myself if you know what I mean
Oh and one more thing: I think its awesome that you guys both came up with stuff to make things better.
The thing we have to remember is that I’m not trying to create a standard carved in stone about how to play these things. I’m basically just sharing my own findings.
My guess is there’s multiple ways to do it that all will work great and there’s actually a lot of room for innovation and other peoples perspectives.
Thats so awesome about this instrument. There’s so much to discover and I’m very curious what other folks like you come up with down the line.
I bet there’s gonna be multiple great layouts over time actually. And also multiple techniques… some wrist, some more finger based etc.
Yeah, changing the layout was kind of cheating I guess. Because the way my brain is used to dividing a piano in 2 sections, I am doing the same for the pad layout. Left side = left hand and right side = right hand. Doesn’t mean I don’t reach both sides with both hands, but when possible I stick to this rule that I am comfortable with.
I guess I use more fingers when hitting single pads (and when hitting the same pad multiple times I always alternate fingers) and I use more writs when hitting multiple pads at once.
But as you know, I am applying techniques that I am familiarized with that I learned from other instruments and they suit me well because they allow me to progress faster.
P.S. - I love the way your 4x4 pad layout was thought. Simple and actually very well suited for both right dominant hand players and left dominant hand players. I believe it will became the “industry standard” in the future of fingerdrumming
I followed the layout from the very begging but I never used 2 equal sounds on different pads. Like you, I have 2 different kicks and also 2 different snares and 2 different hi hats and open hi hats.
The reason I chose to do it this way is to have more variation of sounds.
I am currently using NI studio drummer and my pad layout is the following - starting from bottom left (1) to top right (16):
1 - claps solo
2 - kick dampened
3 - kick open
4 - sticks hit
5 - woodblock high
6 - snare rimshot
7 - snare halfway L/R
8 - woodblock
9 - hihat closed tight tip L/R
10 - hihat open 3/4
11 - hihat closed pedal
12 - hihat open full
13 - Tom 3 center L
14 - Tom 2 center R
15 - Tom 1 center R
16 - crash 1 edge
I often change pads 1, 4, 5, 8 to experiment different things.
I didn’t put much though or effort picking up the sounds. I just wanted more variety and I quickly chose with my own ears and made some changes in a way I had something decent to practice. I would have to rethink everything if I was going for a live gig tomorrow
I guess that with time, I will change the sounds (while sticking faithful to the pad layout core). But I honestly don’t put much thinking on it. It will came whenever I fell the need to do it.
P.S. - In my opinion, the layout was very well thought and I wouldn’t change the place were the kicks and snares are (even though I would use 2 different kicks and 2 different snares). I wouldn’t change the place of the Toms or the Crash. The hihats row I would change it the way I would feel comfortable with, just like you did, but remember that by swapping a closed hihat for an open hihat it will be more difficult to study while reading the diagrams. You can always edit the diagrams yourself of course
Right, I had not taken this into account aka " This finger drumming exercise will melt your brain" in the you tube video. https://youtu.be/iM11Xiwcg_s?t=91
Interestingly when I started to listening to the “this finger drumming exercise will melt your brain” video I instantly thought, "that sounds kinda like the classic drum intro to the title track on Blood Sugar Magic - by the red hot chilli peppers and someone else, in the you tube comments section, made a reference to the exercise mimicking another RHCP track on the same album as well, (and regardless of your thoughts abt RHCP I think it is universally acknowledged that the drummer, (Chad Smith) is a master.
The main point, at least while in infancy, is to settle on the same layout because once skills start advancing bad habbits are hard to break. In response to this response… I Will be revisiting open hat on pad 10.
Me so far:
1 - Empty
2 - kick Small
3 - kick Big
4 - weird backwards, (woosh) snare
5 - Rim shot, (subject to change)
6 - Small Snare
7 - Big snare
8 - clap, (subject to change)
9 - hihat open, (subject to change)
10 - high hat closed small, (subject to change)
11 - high hat closed big
12 - Ride
13 - Tom 3 center Low
14 - Tom 2 center Mid
15 - Tom 1 center High
16 - crash
I guess the worst place to be on the grid is 1 and 4 - nobody wants to be friends with them.
When you guys are ready, make sure to check out the “Building Fills” course.
For a few reasons:
I think it really drives the point home of how you should practice and what you should focus on and don’t go too fast and get sloppy. (If you talk about bad habits thats the worst one)
It actually helps you in training to hit all 3 cymbals effortlessly (so also the ones on pad 1 and 4)
I totally agree about bad habits being hard to unlearn. I found that the more control I have over my hands and the better my inner clock is developed, the less it matters what the pad layout is. So make sure to slow things down, get a good flow going between your hands, work kn that inner clock, count out loud while playing etc.
And then you’ll just become a boss. As soon as you’re done with the courses you can basically just go out into the world, change your pad layout to whatever works for you and impress everybody with your skills
I concede defeat - I’ve moved the open hats to pad 10 and they will be staying there. I think ppl sometimes forget the power of hats and pad 10 offers much more flexibility when you evolve our of RLRLRLRL and only took a couple of hours to get used to.
So I think I’m now rocking a 100%, “quest for groove” pad… searching for the perfect beat - and my, “inner clock.” Interesting going over the beginner classes again, (having completed them a while ago) now I can actually co-ordinate myself a bit better - its like a rebirth.
Next - the amen break… my god, how dd anyone think that combination up.
 ) it’s nice to have it in the middle between the hats. That way you can pick where you place it and it doesn’t have to be upbeats only.